I make an effort to create this page because I have many students ask me “How do you play solos or improvise on the guitar?” Well…, this can be a very long and complicated answer and the response can greatly vary depending upon which musician is asked. However, I have developed some shortcut methods in explaining how to play solos that “sound good”. There is indeed a theory and science behind it that can be expound upon. If practiced correctly, you will be able to find your way around the neck and play the guitar more naturally within a few months, so get excited!
Scales
The first thing to become familiar with is a scale. There are a total of 12 notes available to choose from in standard music: C, C#, D, D#, E, F, F#, G, G#, A, A# and B (also be known as: C, Db, D, Eb, E, F, Gb, G, Ab, A, Bb, and B). However, songs and compositions generally have a key signature. This determines the scale by what set of notes or pitches are available to use.
A standard major or minor key signature (which are the most common) determines that we only use 7 of those 12. For the sake of keeping things as simple as possible, we will be using the key of C major (no sharps #’s or flats b’s) for defining how this works. So, the only notes we want to focus on from the musical alphabet are (starting from the root): C, D, E, F, G, A, and B.
Some may be familiar with the guitar’s CAGED system. It is recommend to visit that link (<— ) if you are completely unfamiliar with this system. This is a great tool for learning the guitar neck. However, more explanation is needed for how we actually use it in a musical context.
Here’s where we connect the dots. Each one of these chord positions within the CAGED system has a scale surrounding it. Click the following chart thumbnail links to enlarge images:
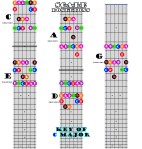
I color coordinated these charts to help the eyes make some visual connections. The sooner you memorize these shapes and positions, the better. Be sure not only to memorize the shapes and patterns your fingers take when playing them, but also what notes you are playing as you play each one. Say to yourself “E” as you are playing the E note’s fret position with the finger on your left hand (or right if you are left handed). Be very aware of the note name and fret position your finger is holding. There are no shortcuts to learning this. Slow and repetition is key to creating habits. Trust me, it pays off tremendously.
Harmony
Ok, cool. Now, we know the scales. How do we actually use these them to play improv solos or write pleasing melodies? It takes a little more than just being able to blaze quickly up and down a scale to make a solo sound good. We need to know a little more about how chords and harmonic function work with music. Let’s go back to the idea of the key signature; it not only defines the notes that are available, but the harmonic function as well by building triads out of them. These are also know as “chords”. Harmonic function is often labeled in roman numerals. These are how chords and harmonic function are labeled for the key of C. Each chart below corresponds with the chord, and again, these can be enlarged with a click.
I = C Major = C = (notes used:) C E G
ii = D minor = Dm = D F A
iii = E minor = Em = E G B
IV = F Major = F = F A C
V = G Major = G = G B D
vi = A minor = Am = A C E
vii° = B diminished = B° = B D F
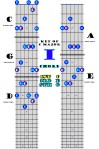

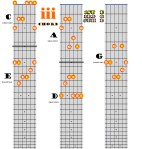

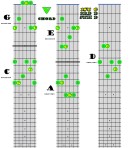
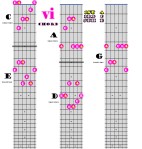
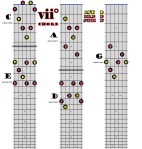
The charts each identify the set of notes used for the corresponding chord / harmonic function. Being aware of these underlying chord shapes and tones within the scale on all positions on the neck is most important for creating those really great sounding melodies.
Let’s say we have a song that uses a progression of chords C, F, and G (I, IV, and V). Corresponding the chart to each chord will give you the notes that are guaranteed to “work” while that chord is being played in the music. So, when the song has a C major chord playing, the notes friendly to play are C, E, and G. When it moves to the F major chord, the notes will be F, A, and C. G major is G, B, and D. Knowing where to find these chord tones and how to relate them to each other on each position (C, A, G, E, & D) of the neck are key to becoming a solo master. On the other hand, do not feel melodies must be limited to using only the chord tones. Using connecting or passing tones within the scale works well too. Playing a melody with a note phrasing like C, D, E, G while a C chord is being played can still work well although the D note is not included in the C chord. Of course it takes some practice to develop some sense of musicality and style, but you can always use a chord tone as a safety and it will always sound “correct” as long as it fits the accompaniment chord being played underneath.
Take notice that chord shapes are similar from one major harmony to another or minor harmony to another. This means once you have memorized the major or minor position shapes for one chord, they can be applied to any other chord by making the same shapes and simply changing the root note (which I have colored yellow in every chord chart). There are only 5 shapes for the major chord, 5 for the minor chord, and 5 for the diminished chord. So, don’t be overwhelmed assuming that a separate shape has to memorized for each chord chart.
I hope this page helps expand some fellow music lovers’ knowledge and ability. It is always more fun to play an instrument when you know how to play it! Feel free to contact me with any questions, comments, or interests in setting up a lesson to explore some more detail on these topics. Thank you for reading. 🙂
